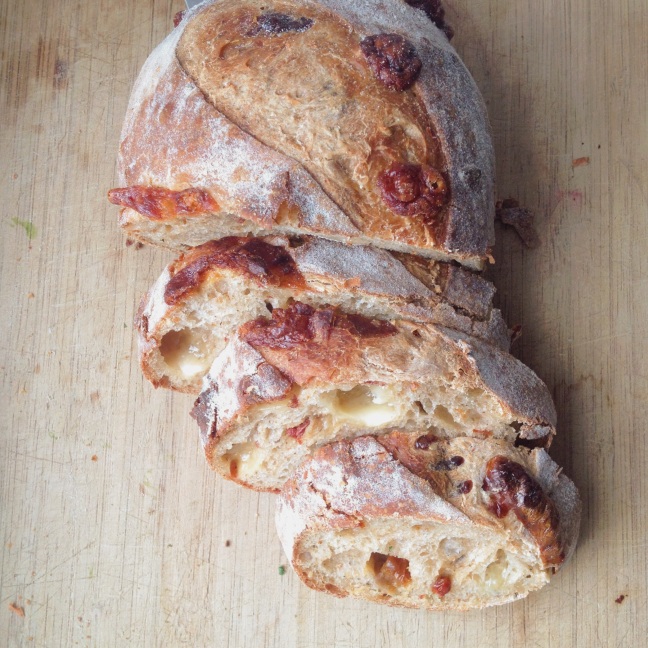
banana oat muffins title

Well kids, it all starts with a craving. Then just mix in a google search and a quick trip to the store, and that’s how these banana oat muffins were born. They are quite delicious and extremely quick and simple to make. You probably already have most of the ingredients on hand, and it certainly wouldn’t be hard to come up with an excuse to make these. They’re also a great way to use up some of those over-ripe bananas you have sitting on your counter. Muffins are delicious at any time of day, and this goes for all “breakfast” foods, in my opinion (or if you need Amy Poehler to convince you, click here). It is easy to substitute ingredients or throw in a little somethin’ extra. I made this batch with toasted walnuts, chocolate chips, cinnamon, and applesauce in place of the oil. Hope you enjoy these as much as I do. Happy Saturday!

Banana Oat Muffins

(original inspiration from here)

1 1/2 cups all-purpose flour
1 cup oats
2 teaspoons baking powder
1 teaspoon baking soda
1/2 teaspoon salt
1/2 cup sugar (white, brown, or a mix)
1 egg
1/2 cup milk (I used almond milk, I think creme fraiche or sour cream would be a lovely substitute as well)
1/2 cup applesauce
1/2 teaspoons vanilla (extract, paste, what have you)
1 cup ripe bananas, mashed

Optional Add-Ins
chocolate chips, or mini chocolate chips if you’re feeling fun and adventurous
toasted nuts, chopped up
a pinch of cinnamon and/or nutmeg

Preheat oven to 400F and line a 12-cup muffin pan.

Mix all the dry ingredients (flour, oats, baking powder, baking soda, salt, sugar, optional spices) in a bowl, and give it a good stir with a fork or a whisk.

In a separate bowl, gently beat the egg, and mix in the rest of the wet ingredients in succession (milk, applesauce, vanilla, banana).

Stir the flour mixture into the banana mixture until just combined. Stir in chocolate chips and toasted nuts, if using. Divide batter into pan and bake for 16-20 minutes, turning the pan half-way through baking. They are done when a toothpick inserted into the centre comes out clean. Cool on a rack for 5 minutes then turn out to cool completely (or to consume immediately, for the impatient and hungry).

NOTE: My muffins really stuck to the lining right after they were baked, but after sealing them in an air-tight bag/container overnight, they loosened up and were much easier to eat. This often causes problems with cupcakes, in that the lining will separate from the cake if left in an air-tight container, but it proved helpful with these muffins.

These have been in a sealed ziplock bag on my counter for 2 days now and they are still moist and delicious. But probably the tastiest the morning after baking, once they’ve loosened their death grip on those liners.

I know I’ve disappeared for a while, but the baking has continued, so more posts shall be on their way soon (hopefully)! In the mean time, here’s a sneak peak at some christmas cookies. Hope everyone is enjoying the holidays!

Image

We took a day trip out of the city today to St.Jacob’s farmer’s market. Of course, there are farmer’s markets in the city as well, but everything is always crazy expensive and often not all that fresh to begin with. You always have to be careful with these kinds of things: one stand could be selling berries from a farm around the corner, and two metres away you’ll find produce from California.

In any case, delicious food was certainly had, and here are some photos to share with you all. Hope everyone gets a chance to get out of the city, especially in this beautiful sun, whether it’s for a farmer’s market, a canoe trip, or even just a scenic drive.

All the jams and jellies you could imagine. Feast your eyes.

They may not be the prettiest looking cinnamon buns, but damn were they delicious.

Definitely can’t go wrong with these amazing apple fritters.

A short drive out of town and into the fields led us to the home of a lovely lady who makes beautiful quits. I picked up this tote with an adorable little house on it.

And to wrap it all up, some wonderful farm fresh eggs. Just $1.25 for the carton! Definitely looking forward to tomorrow’s breakfast :)

I started working at a French patisserie in Toronto a couple weeks ago. They make super tasty macarons and after trying one of each, the matcha green tea definitely stood out as a favourite. So of course, I had to try it out at home. I made a batch this morning, and although quite different from the ones in the store, they are so so good. I usually only eat one or two macarons from the batch, but I’ve already had four of these hehe.

I picked up this bag of matcha green tea powder from a Korean grocery store by my house. The stuff is quite pricey!

I added just a tablespoon or so into the shells and that was enough to colour them, so I didn’t need to any other green colouring. I filled them with a white chocolate ganache with the same matcha powder mixed in, and whipped it to a delicious creamy goodness.

There’s no doubt these will all be gone in no time. Although the matcha is pricey, these are just so delicious I’ll definitely be making them many more times to come.

Matcha Green Tea Macarons

105 g egg whites (about 3 eggs, I have had no problems with the carton egg whites either)
110 g granulated sugar
140 g almonds, ground or sliced (you can replace 40 g of the almonds with other nuts, such as pistachios or pecans)
90 g icing sugar
1 tbsp matcha powder

Same method as posted here, just mix in the matcha powder with the icing sugar and almonds.

Matcha Green Tea Ganache

8 oz white chocolate
1/2 cup heavy cream
1-1.5 tbsp matcha powder (I didn’t actually measure how much I put in, but I think this is close)

Coarsely chop the chocolate and place in a heatproof bowl over a pan of barely simmering water. Stir occasionally until almost all the chocolate is melted.

In a small saucepan, heat the heavy cream, add the matcha, and whisk to combine. This doesn’t need to boil, but it should be quite warm.

Pour the matcha cream mixture into the bowl of melted chocolate and stir to combine. Let the mixture cool to room temperature, then place in the fridge for at least 30 minutes. You can use it just like this, or whip it with an electric mixer for about 1 minute (careful not to overmix!). The whipped mixture will be lighter in colour.

Related Posts:

macarons part one: french meringue method

macarons part two: coffee, pistachio, chocolate, lemon

macarons part three: swiss meringue method

Just a quick post to update on my second attempt at brush embroidery. Mixing the colours was lots of fun, and moving from the kitchen counter to the dining table was certainly appreciated by my back. I still can’t manage to get the cookies to taste all that great though, with all that icing. But, I guess that’s just what you get when you work with royal icing. These designs were my best attempt at replicating the beauties created by SweetAmbs (head over there to bask in her glory). I think I’ve gotten the brush embroidery technique down so it is time to come up with some of my own designs!

I also put the owls from the last post onto this batch of cookies. I think it worked out well! I’m personally a fan of the big fat one in the bottom corner ;)

So I decided to try out some brush embroidery. I had bookmarked several beautiful cakes and cookies that all used the technique, and finally got around to trying it myself. It took me a while to figure it out and I’ll definitely need to keep practicing, but this technique is super fun, so I recommend giving it a shot if you’ve never done it before. A great tutorial from SweetAmbs can be found here. 

I’m quite impatient, so of course I started decorating the cookies when the base layer of icing wasn’t completely dry yet. Anyone could tell you that’s a dreadful idea, but of course I went ahead anyway. This created some problems, but seeing as this was my first practice round, I can deal with some smudged and holey icing.

These are just simple sugar cookies with a little lemon, covered with a layer of thinned royal icing, then decorated. (You can see all the spots where my damp brush poked a hole in the not-yet-dry coloured icing hehe)

I attempted to make these beautiful ombre cookies from SweetAmbs . . . I’ll try again next time haha

Leftover icing? No problem. I played around with some more colours (red is impossible to make without a ton of colouring!) and made some birds and such for a next batch of cookies. Of course, royal icing also keeps for a long time (I’ve heard up to a month) as long as it is well covered. I kept mine just on the counter in a sealed container for a couple days with no problem whatsoever.

I’ll definitely try this again sometime soon. I hadn’t made sugar cookies or royal icing in years prior to this. Maybe if I keep practicing and experimenting, I could actually send out some pretty christmas cookies this year.

[click here for part two]

Follow

Get every new post delivered to your Inbox.

Join 60 other followers